Master the Birding Perch Pic Trend: Ultimate Guide to Backyard Bird Photography
Master the Birding Perch Pic Trend: Ultimate Guide to Backyard Bird Photography
The birding perch pic trend has taken social media by storm, transforming ordinary backyard bird photography into an art form that attracts millions of views across Instagram, TikTok, and Facebook. This comprehensive guide reveals the secrets behind creating stunning bird perch photos that will elevate your wildlife photography and capture the perfect shot every time.

Table of Contents
- What is the Birding Perch Pic Trend?
- Essential Equipment for Success
- Creating the Perfect Bird Stage
- Strategic Positioning and Setup
- Optimal Camera Settings
- Concealment and Patience Techniques
- Common Mistakes to Avoid
- Frequently Asked Questions
What is the Birding Perch Pic Trend?
The birding perch pic trend represents a revolutionary approach to backyard bird photography that has gained massive popularity on social media platforms. Unlike traditional bird photography that relies on chance encounters, this trend involves creating carefully crafted "bird stages" – elevated platforms with natural perches positioned strategically between feeders and natural bird pathways.
Professional photographers and hobbyists alike are sharing behind-the-scenes content of their setups, creating viral content that demonstrates how simple preparation can yield extraordinary results. The trend emphasizes the importance of the perch itself – "the perch matters as much as the bird," as leading wildlife photographers often say.
Essential Equipment for Success
Camera and Lens Requirements
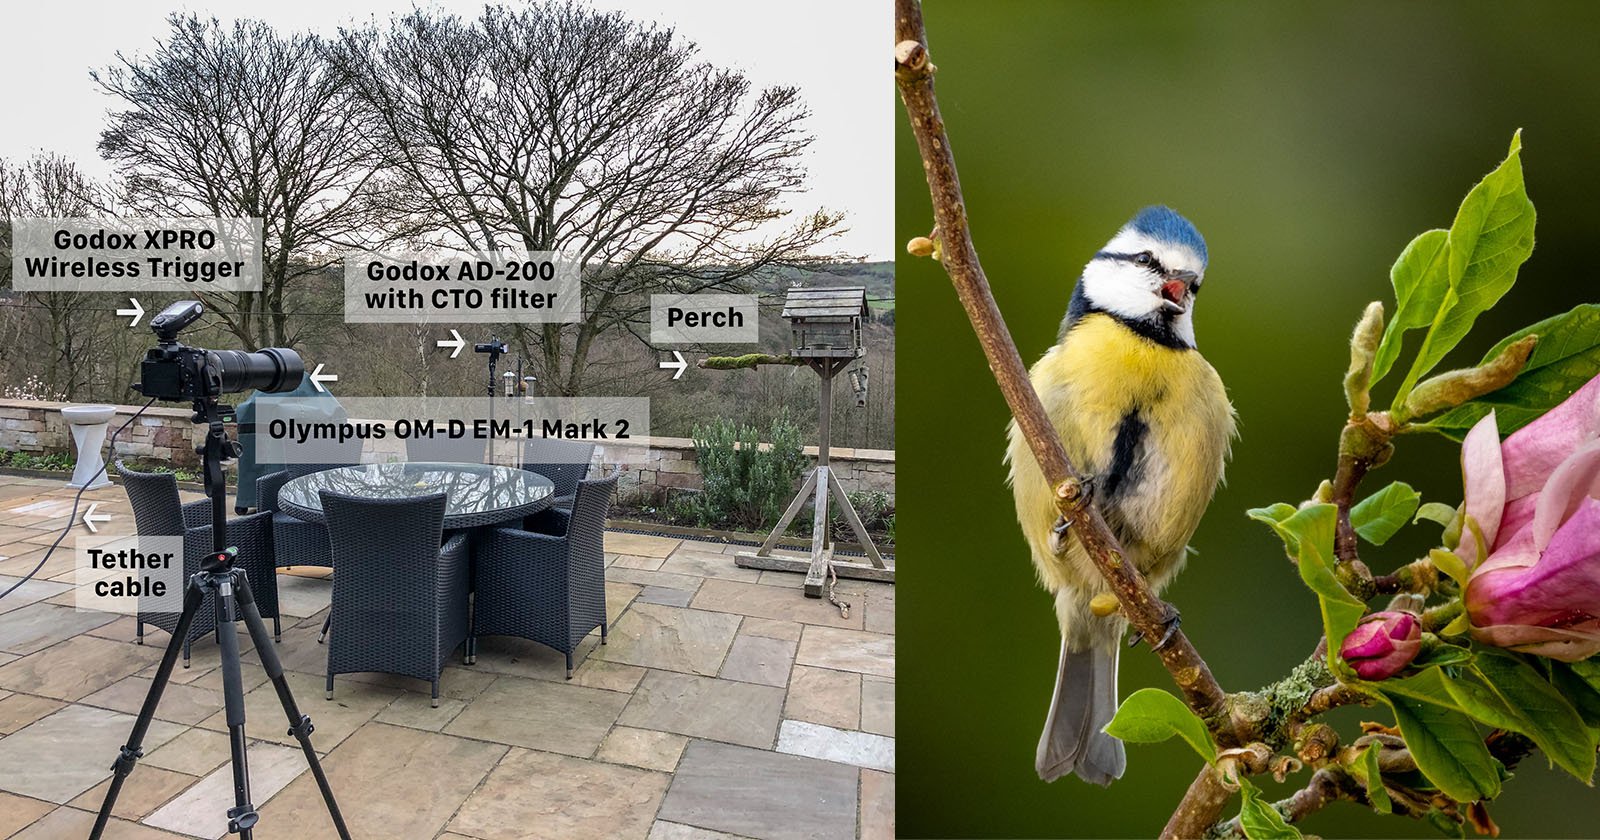
For optimal results, you'll need a focal length equivalent to at least 500-600mm on a full-frame camera. Popular choices include the Sony 200-600mm G, Canon RF 100-500mm, or Tamron 150-600mm lenses. Even with a 600mm lens, you'll need to position yourself surprisingly close – often just 7 feet from your subject – to achieve frame-filling shots of small birds.
Support System
A sturdy tripod with a gimbal head is essential for sharp images. The gimbal keeps your camera perfectly balanced and ready for instant action, eliminating the need to constantly adjust settings between shots. Avoid pushing weight capacity limits – choose a tripod that can easily handle your camera and lens combination.
Creating the Perfect Bird Stage
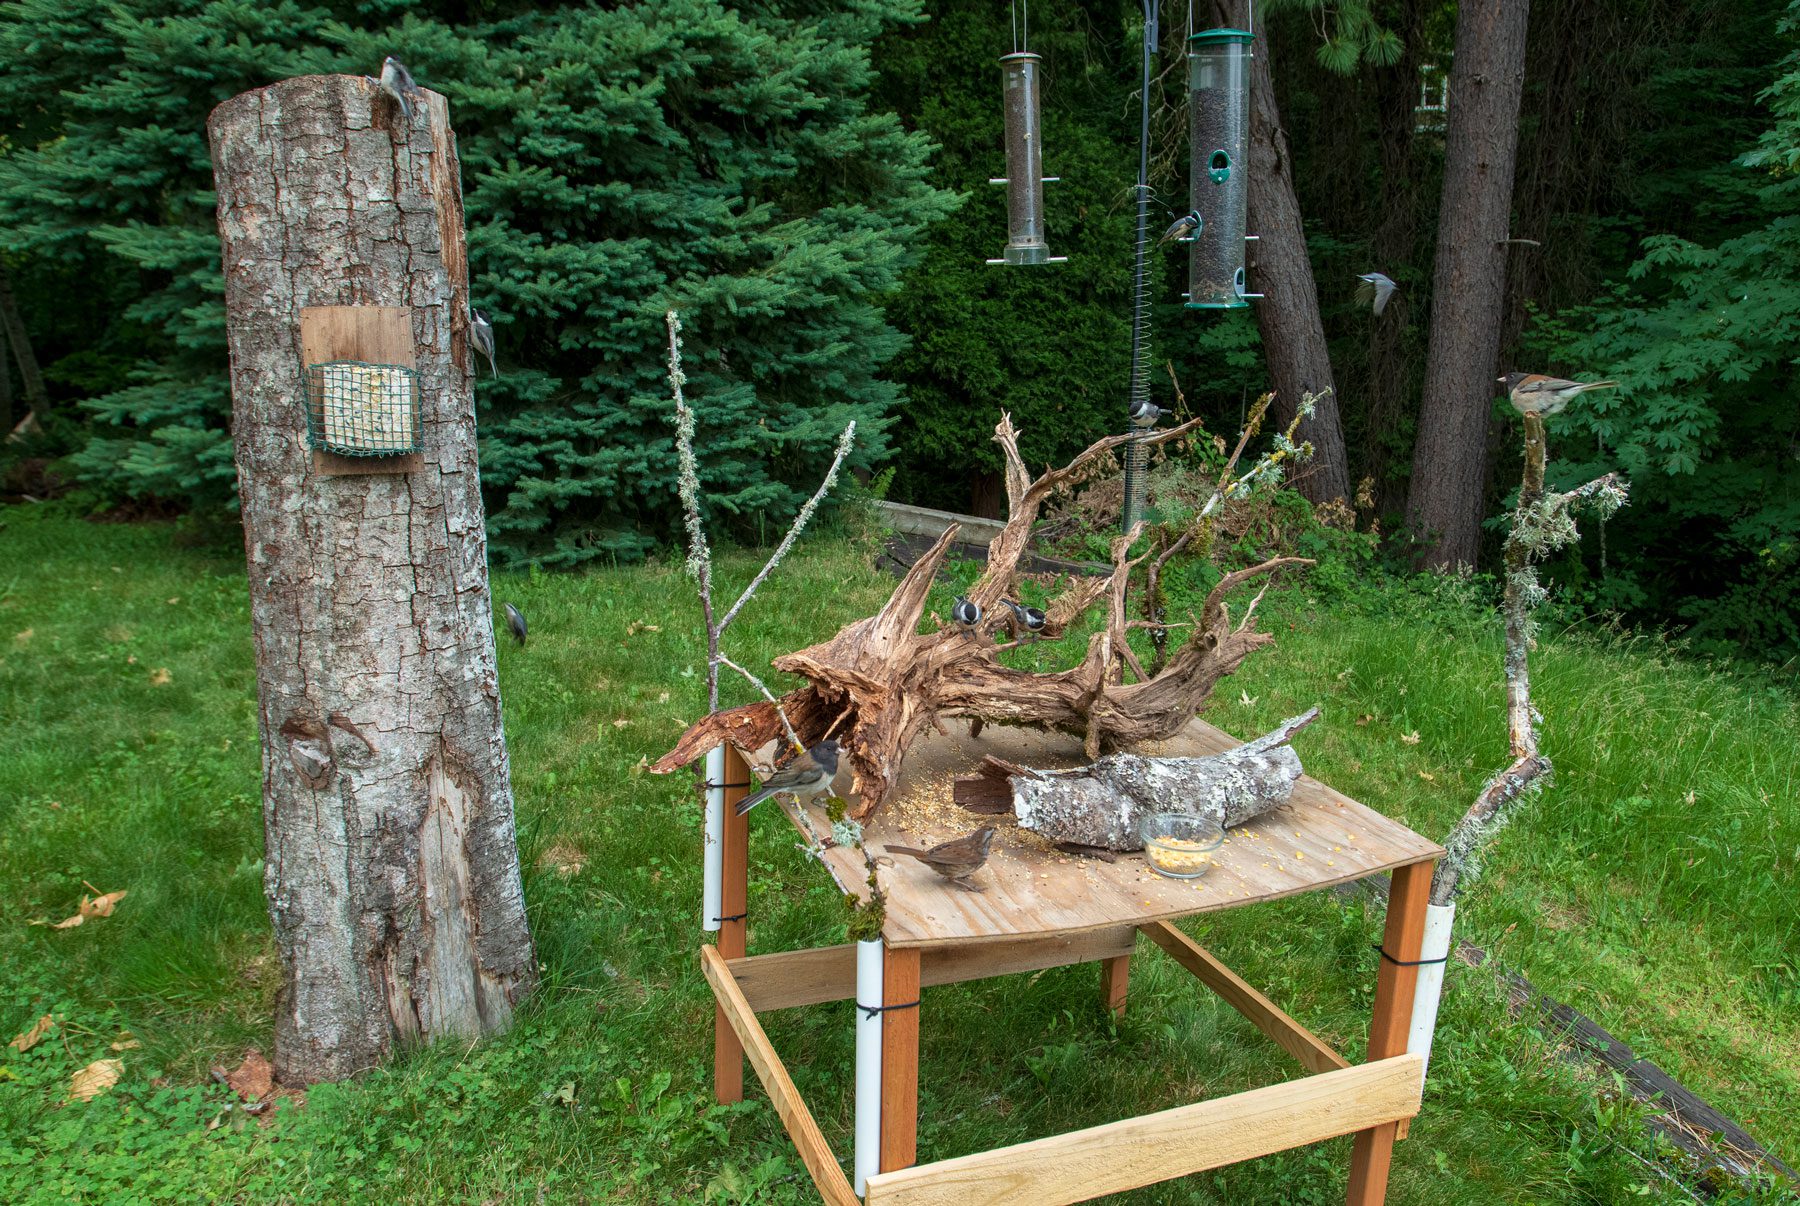
Building Your Platform
Construct an elevated "bird stage" using sawhorses and wooden planks, raising perches to your camera's eye level. This elevation provides complete background control and creates beautiful bokeh (out-of-focus blur) that separates your subject from the background.
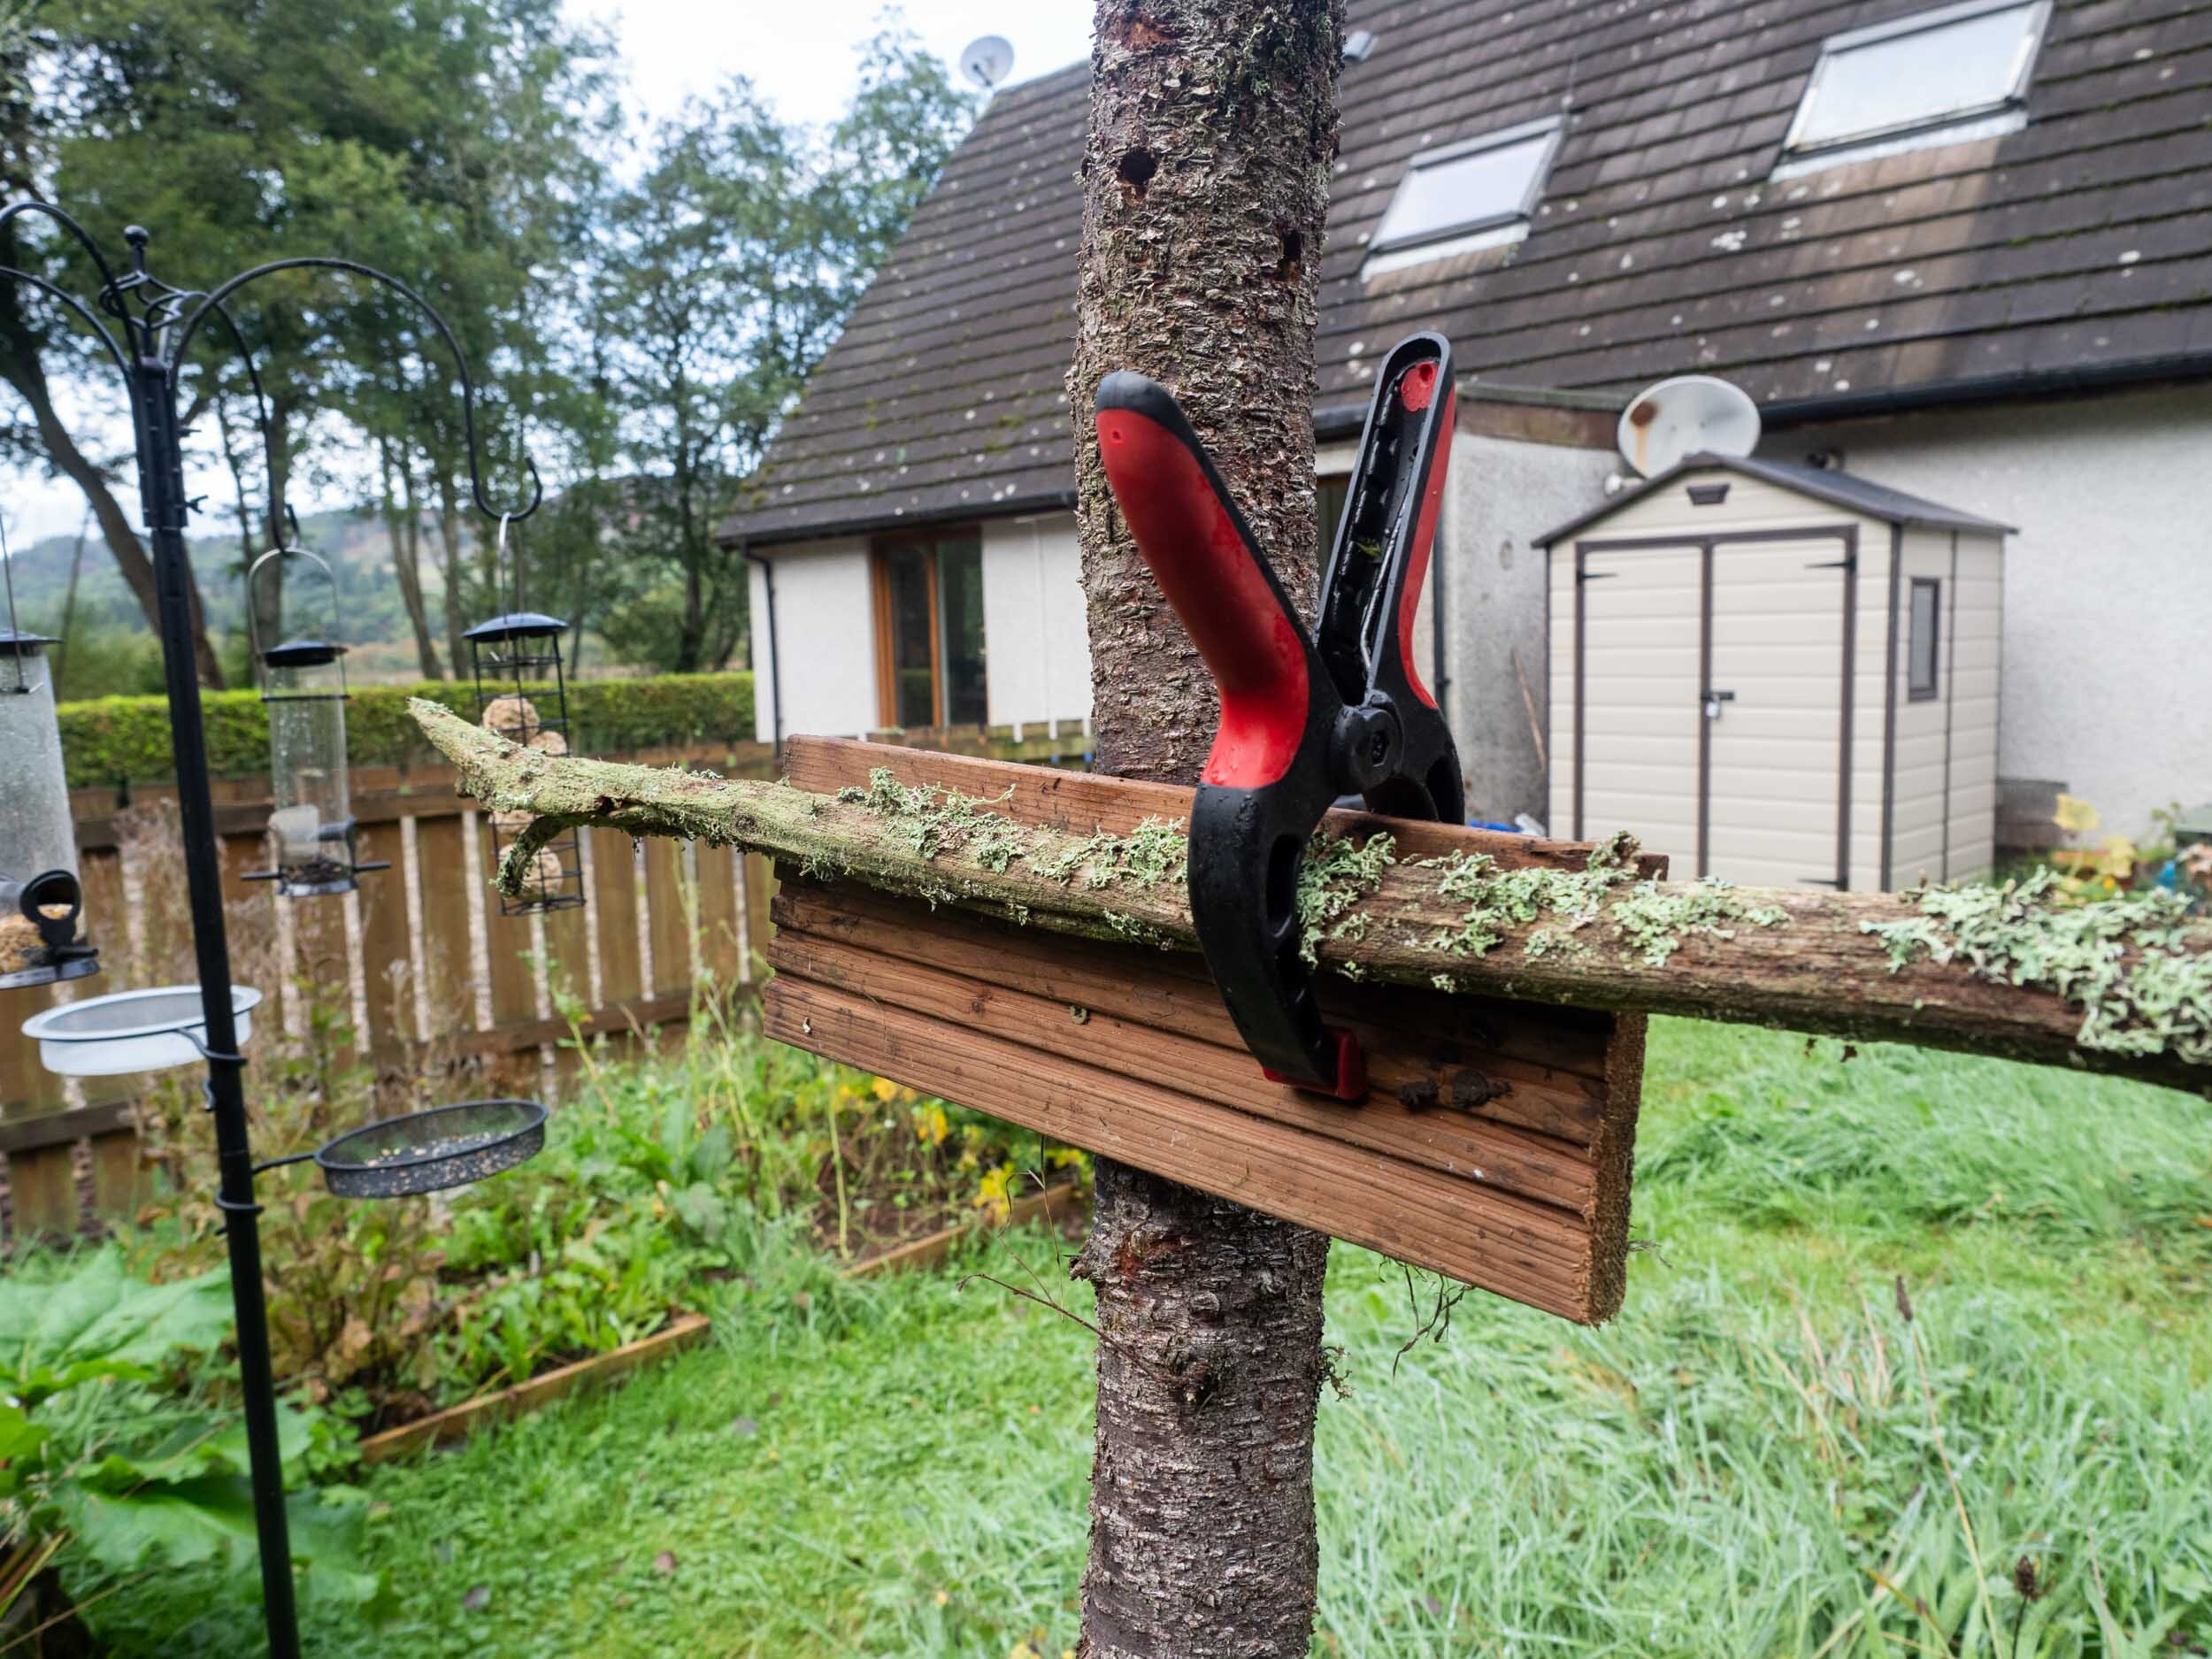
Selecting Natural Perches
Choose branches with interesting textures, colors, and natural character. Look for:
- Hardwood branches for sturdy perching
- Moss or lichen-covered wood for visual appeal
- Dark or mid-toned branches that won't distract from the bird
- Various sizes to accommodate different bird species
Adding Natural Elements
Enhance your stage with dirt for ground-feeding birds and small water features for drinking and bathing opportunities. Place rocks in water containers to create ripples that catch light and attract birds from greater distances.
Strategic Positioning and Setup
Light Angle Considerations
Position your perch setup on a North-South line, allowing you to shoot facing East or West depending on the time of day. For morning photography, position the perch facing east with the rising sun behind you. Birds are most active right after dawn, making this the optimal shooting time.
Background Distance and Selection
Create maximum distance between your bird stage and the background to achieve greater blur and subject separation. Choose backgrounds with natural colors – greens, greys, and blues work best. Avoid man-made objects or competing colors that draw attention away from your subject.
Feeder-to-Perch Positioning
Place your bird stage directly between the feeder and larger trees where birds naturally retreat. This creates a natural stopping point where birds pause to assess safety before feeding, giving you multiple photography opportunities.
Optimal Camera Settings
Recommended Settings
Use Aperture Priority (Av) mode with these baseline settings:
- ISO: 800 for sunny conditions (adjust to 1600 in shade)
- Aperture: f/8 for sharp subjects with good background blur
- Shutter Speed: Minimum 1/1200s for stationary birds, 1/2000s+ for action
- Focus Mode: AI Servo for continuous tracking
Focus Techniques
Always focus on the bird's eye – if the eye isn't sharp, the entire image suffers. For multiple birds in frame, focus on the closest subject rather than the middle of the group.

Concealment and Patience Techniques
Photography Blind Options
Professional portable blinds like the Tragopan Monal V2 offer the best concealment and comfort for extended sessions. For budget-conscious photographers, the LensCoat LensHide provides adequate concealment at a lower cost, though with less mobility.
Vehicle as Mobile Blind
Your car makes an excellent mobile blind – birds typically ignore parked vehicles while remaining wary of humans. Turn off the engine while shooting and stabilize your lens against the window frame for shake-free images.
Indoor Shooting
Shooting from inside your house through windows or doors provides comfort and flexibility. Use the second floor to access natural tree-level perches, but watch for heat shimmer in temperature differences.
Common Mistakes to Avoid
Centering Birds in Frame: Leave space in front of the bird for it to "look into" – this creates more dynamic composition.
Ignoring Shadows: Check for shadows cast by overhead angles or your own position. Keep your shadow pointing toward the bird for optimal lighting.
Getting Too Close Too Fast: Allow birds to adjust to your presence. Often, patient photographers find birds actually move closer on their own.
Neglecting Background Elements: Watch for distracting branches, poles, or unnatural colors that compete with your subject.
Frequently Asked Questions
How close do I need to be for frame-filling shots?
Even with a 600mm lens, you'll need to position yourself approximately 7 feet from small birds to achieve significant frame filling. This closer distance often surprises new bird photographers.
What's the best time of day for perch photography?
Early morning, starting about an hour after sunrise, provides the best combination of bird activity and lighting quality. Late afternoon until an hour before sunset also works well.
How long should I leave my setup unchanged?
Leave your bird stage setup for at least several weeks to allow birds to become comfortable with the arrangement. Frequent changes will make birds more cautious and less likely to use your perches.
Can I use a 2x teleconverter for more reach?
While possible, 2x teleconverters significantly degrade image quality and autofocus performance. It's better to move closer to your setup or invest in a longer focal length lens.
Take Your Birding Photography to the Next Level
The birding perch pic trend has democratized wildlife photography, proving that stunning results are achievable in any backyard with proper planning and patience. Start with a simple setup, focus on understanding your local bird behavior, and gradually refine your technique.
Remember that each location and season brings different opportunities – what works for winter birds may need adjustment for spring migrants. Document your setups and results to build a reference for future success.
Ready to join the trend? Share your perch pic creations on social media using #BirdingPerchPic and #BackyardBirdPhotography to connect with the growing community of bird photography enthusiasts!
📸 Share This Guide! Found this article helpful? Share it with fellow bird photography enthusiasts on social media and help grow the birding perch pic community. Your perfect shot is just one setup away!


